
.png)
CNC Operation (Laguna)
- Jatin Soni
- Apr 28, 2020
- 4 min read

After you have created your CAM profile and post-processed it, it's time to actually machine the part! The following text will cover the operation of the Laguna CNC. Important: The CNC is capable of cutting thru metal, and so it is possible to seriously injure yourself and others if it is operated incorrectly. Do not operate the CNC if Mr. Shinta is not present in the room (unless he has specified otherwise). Safety glasses are a must, and you are responsible for your safety as well as anyone around the machine (So make it clear that everyone needs glasses). Supervision is required unless you have been approved to operate the CNC alone. With that, read through to learn how to use the Laguna CNC!
Preparation:
The Post Processes should be in a folder which can be transferred into a USB disk
Clear the CNC table of tools and any junk
Grab the tools that will be used during the whole cut as well as find the proper collets
Find a space large enough for the cut on the material, clamp the material down with clamps and screws to make sure it doesn’t move in the area that will be cut
Plug in the USB into the handheld controller
Change the tool to the correct one if needed on the CNC spindle
Select the correct file (located in "UDisk") on the controller
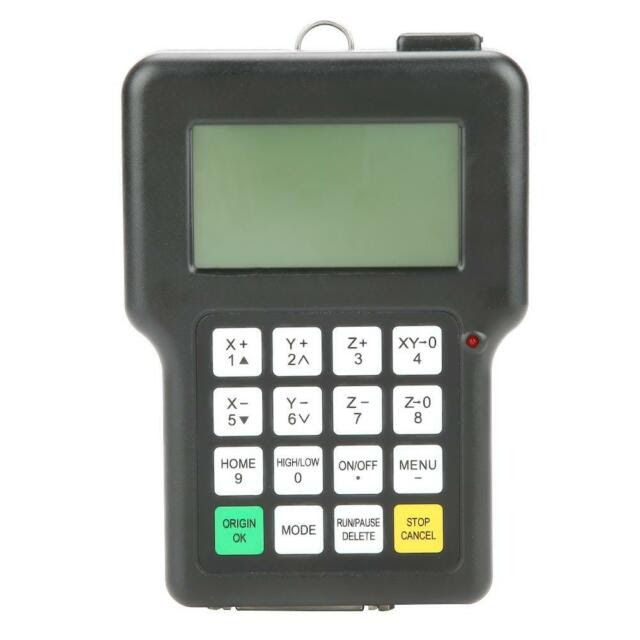
Handheld Controller Usage:

Here's the link to a spreadsheet with the recommended CNC speeds: https://docs.google.com/spreadsheets/d/1h5xuGp8lyXH_XhM3Qpnia36MObEhu2rZI8jA7tbsC8w/edit?usp=sharing
Procedure for Aluminum/Polycarb Plate:
Set Origin (DO NOT USE ORIGIN 8 OR 9, THOSE ARE FOR THE 2x1 JIG)
Navigate to a corner above the material and make sure you have enough room to cut the pieces
Make sure the axes on the CNC are in line with the axes that were set in the CAM
Zero the x-y at that point
Slowly lower the spindle and check with a piece of paper when the tool hits the paper and it can’t move
Zero the z
Go to origin
Running the operation
Navigate to the desired operation and change the speeds if needed
Start the vacuum cleaner with the red remote
Check to make sure the table is clear, the material is clamped, the correct tool is in place, the spindle is zeroed correctly, and begin the operation
Pause the operation immediately if something seems wrong. A pause will stop the operation and can be continued, whereas a break will break the operation and ask the user if it needs to be saved. If saved, the operation can be resumed at a later time.
Wait until the operation is done and move the spindle to its absolute zero to change tools. Remember to zero the z again if the tool is changed since it can vary from tool to tool
Move the spindle out of the way if screws need to be added
Changing Speeds-Spindle
Locate the control panel located in the front of the CNC (facing Mr. Shinta’s desk)
Locate the control box and set the frequency to the correct speed (take frequency * 60 to get RPM)
Changing Speeds- Work
You can only change this when you resume a break or start a new process
Note: If resuming from pause, you can change the percentage of speed (keep this at 1)
Press the edit
Important Information:
CAM is instructions to turn a representation of 3d model into the physical part
CAM software turns CAD file into g-code which can be used with machining
For plates and batches, it is recommended to use nesting to combine various plates at once and then cam the whole assembly while for individual parts just CAM the part file.
Procedure for Aluminum Tubes (2x1s, 1x1s, etc.):
Set up the piece
Clear the 2x1 jig of any dust/excess material with brush/compressed air
Make sure the 2x1 piece has been squared off on one side (if not do it or have someone do it on the mill)
Place the squared off side of the 2x1 against the screw and rail of the jig
If it’s in a horizontal orientation, add the shim (golden strip) and tighten the allen screws with a ⅜ allen key
If it’s in a vertical orientation, add a 1x1 tube to the side and then add the shim and tighten everything
Softly hammer down the 2x1 with the head of the allen key to make sure it rests flat and check for any undesired movement
Set Origin
Select preset 9 on the CNC controller and navigate to the origin (it should be the corner of the 2x1 where the origin was set in the CAM)
Make sure to move the spindle to be slightly over the 2x1 so that the z zero can be properly set
Slowly lower the spindle and use a piece of paper to check when the spindle is right above the 2x1 and zero the z
Go back to the origin
Running the operation
Navigate to the correct operation and change any speeds if desired
Start the vacuum cleaner with the red remote
Check that the table is clear, the 2x1 is properly in place and held securely, the correct tool is in place, the spindle is zeroed in the correct position (X, Y, Z), and finally, begin the operation
Pause the operation if something seems wrong, and either discard or save the break
For symmetric operation, loosen the screws and flip the 2x1 and begin the previous operation. Note: Recommended to mark the sides after you cut them to make it easier to remember which side was cut
Depending on the length of the endmill, the parting operation might leave a small section of the 2x1 uncut
Use the manual mill to cut the 2x1 to the correct length, or use the bandsaw for unusual parting shapes
Remember to zero the z after tool changes


Comments